If you use LinkedIn regularly, you already know consistency matters. Posting once in a while rarely gets results. That’s why many creators, marketers, and page admins schedule posts in advance. It saves time and keeps your page active even on busy days. But here’s the problem. After scheduling posts, a lot of people get stuck trying to find them again. You might ask yourself: Did it actually schedule? Can I still edit it? Where did LinkedIn even put it?
If you’ve ever wondered how to see scheduled posts on LinkedIn, you’re not alone. The option exists, but it’s not exactly obvious. LinkedIn hides it behind a small icon that many users overlook. In this guide, you’ll learn exactly how to view scheduled posts on LinkedIn, step by step, using LinkedIn’s native tools. No third-party apps. No guesswork.
Why checking scheduled posts matters more than you think
Before jumping into the steps, it’s worth understanding why this feature is important. Scheduled posts aren’t “set and forget.” Sometimes you want to:
- Double-check the wording
- Update a link
- Fix a typo
- Change the posting time
- Delete a post because plans changed
If you don’t know where to find scheduled posts, you lose that control. Worse, you might accidentally publish something outdated or off-brand. Knowing how to access them gives you flexibility and peace of mind.
Step-by-step: How to see scheduled posts on LinkedIn pages
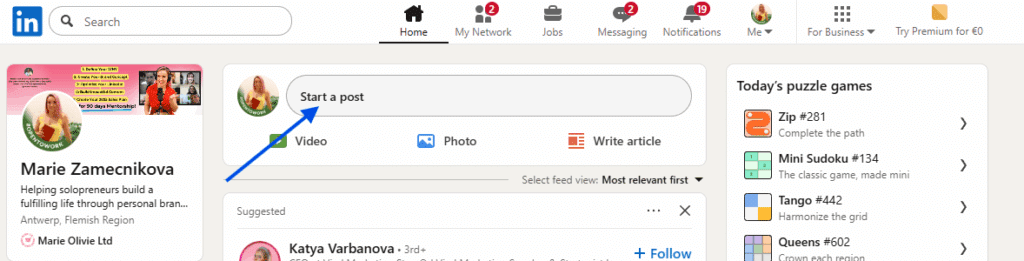
1. Go to the homepage
First, log in to your LinkedIn account as usual. Stay on the homepage.
2. Click the “Create post” button
Once you’re on your homepage, look for the blue Create post button near the top. Click it, just as if you were about to publish a new post. This step is important. Many users assume scheduled posts live in analytics or settings. They don’t. They’re tied to the post creation flow.
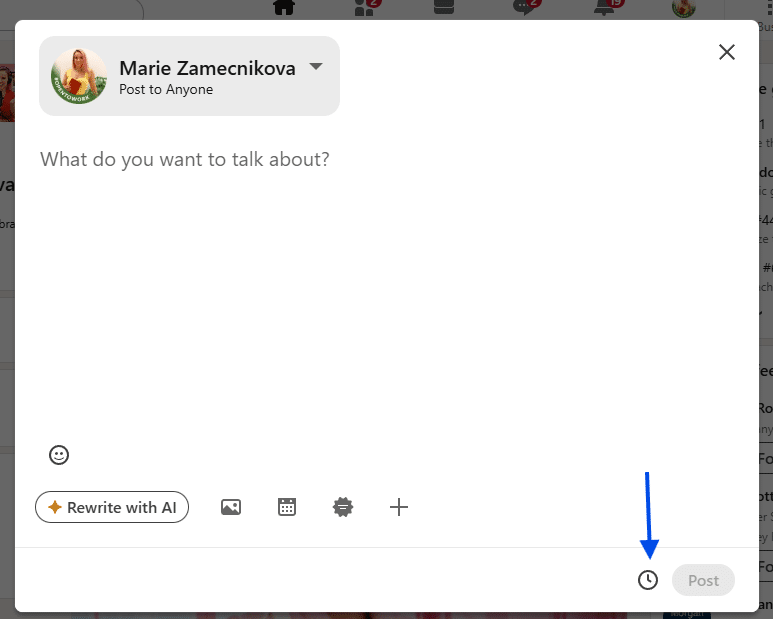
3. Find the small clock icon
After clicking Create post, a post editor window opens. Now look closely at the bottom right corner of this window. You’ll see a small clock icon. It’s easy to miss if you’re not looking for it. This clock icon is the key to everything. Click it.
4. Access your scheduled posts
When you click the clock icon, LinkedIn opens a new window showing all your scheduled posts. Here, you can:
- See every post you’ve scheduled
- Check the exact date and time they’ll go live
- Edit the content
- Reschedule them
- Delete posts you no longer want to publish
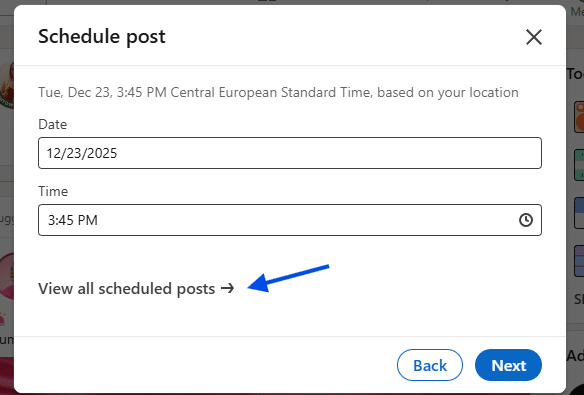
This is the exact place LinkedIn stores scheduled content. Once you know this, finding scheduled posts becomes quick and simple. That’s it. No extra menus. No hidden settings.
Common mistakes people make when looking for scheduled posts
Many users struggle because they:
- Look in LinkedIn analytics
- Check notifications
- Search through drafts
- Expect a separate “scheduled posts” tab
LinkedIn doesn’t organize it that way. Everything lives behind the clock icon in the post editor. Once you remember that, the process feels obvious.
Tips to manage scheduled posts more easily
Now that you know how to view scheduled posts on LinkedIn, here are a few practical tips to make scheduling smoother:
- Review scheduled posts once a week to catch errors early
- Avoid scheduling too far in advance if content depends on trends or news
- Keep posting times consistent to train your audience
- Edit posts if engagement patterns change
Small checks can prevent awkward moments later. LinkedIn scheduling is a powerful feature, but only if you know where to look. If you’ve ever felt confused trying to find your queued content, you’re not doing anything wrong. LinkedIn simply doesn’t make it obvious. Now you know exactly how to see scheduled posts on LinkedIn and where they’re hidden. Next time you schedule a post, you’ll know how to check, edit, or remove it in seconds. And once you’ve mastered this, managing a consistent LinkedIn presence gets a lot easier.