If you’ve ever lost access to an old email address, you already know how stressful it can be. Now imagine that email is tied to your LinkedIn account. Suddenly, you can’t reset your password, confirm security alerts, or receive important messages from recruiters. That’s why knowing how to change primary email on LinkedIn is more important than most people realize.
The good news is that LinkedIn makes the process fairly simple once you know where to look. Whether you’re switching jobs, cleaning up old accounts, or just improving security, updating your primary email is a smart move. Below is a clear, step-by-step guide based on LinkedIn’s official process, with a few practical tips along the way.
Why your primary email on LinkedIn matters
Your primary email address is the main way LinkedIn communicates with you. Password resets, security alerts, connection requests, and job notifications all go there first. If that email is outdated or insecure, you’re taking an unnecessary risk. Many users create their LinkedIn profile with a work email. Years later, they change jobs and forget to update it. Others want to move away from an old inbox that’s full of spam. Whatever the reason, learning how to change primary email on LinkedIn helps you stay in control of your account.
Step-by-step: How to change primary email on LinkedIn
Follow these steps carefully. The process only takes a few minutes, but you’ll need access to both your LinkedIn account and your email inbox.
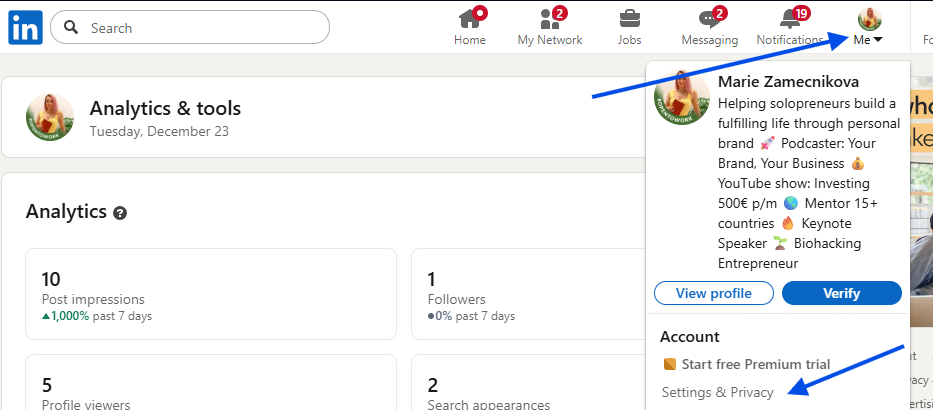
Open your LinkedIn settings: Log in to LinkedIn and look at the top of your homepage. Click the Me icon, which usually shows your profile photo. From the dropdown menu, select Settings & Privacy.
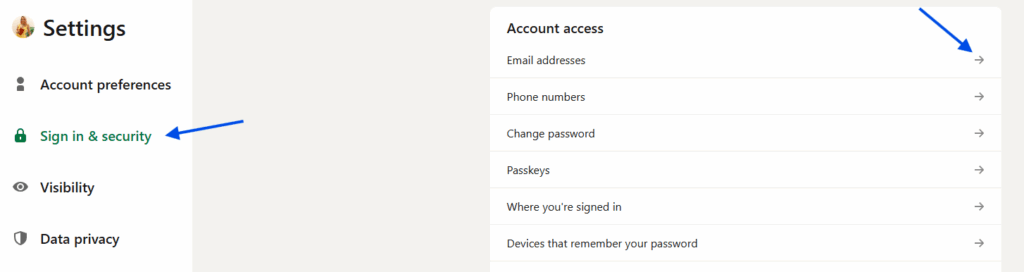
Go to sign in & security: On the left side of the Settings page, click Sign in & security. This section controls how you access your account and how LinkedIn verifies your identity.
Open email addresses: Click Email addresses. Here, you’ll see all the email addresses currently linked to your account and which one is marked as primary.
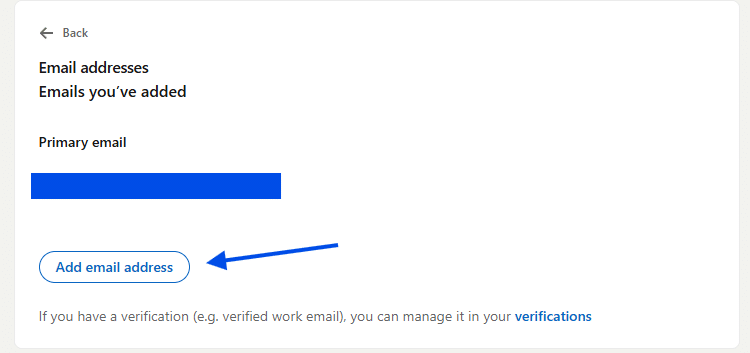
Add a new email address: Click Add email address. LinkedIn may ask you to enter a verification code that’s sent to your current primary email, or it may ask you to approve the action through the LinkedIn app. This step is for security and helps prevent unauthorized changes.
Enter your new email: Type in the new email address you want to use and enter your LinkedIn password. Then click Submit.
Verify the new email address: Check your email inbox for a message from LinkedIn. Open it and follow the prompts to confirm and validate your new address. This step is required before you can make it primary.
Make the new email primary: Once the new email is verified, return to the Email addresses section. Click Make primary next to the email you just added. That’s it. You’ve successfully completed how to change primary email on LinkedIn.
Removing an old email address
After you set your new primary email, you may want to remove the old one. This is especially important if you no longer control that inbox. To do this, go back to the Email addresses section and tap Remove next to the email you want to delete. Make sure you’ve already set a new primary email before removing the old one, or LinkedIn won’t allow the change.
Common issues and quick fixes
Sometimes users run into small problems during the process. Here are a few quick tips:
- Didn’t get the verification email? Check your spam or promotions folder.
- Lost access to your old email? Use the LinkedIn app verification option if available.
- Security prompt keeps appearing? This usually means LinkedIn is protecting your account. Follow the instructions carefully and don’t rush.
Final thoughts
Knowing how to change primary email on LinkedIn is one of those small tasks that can make a big difference. It improves security, ensures you never miss important messages, and keeps your account fully under your control. If you haven’t checked your LinkedIn email settings in a while, now is a good time. A few clicks today can save you a lot of frustration later.